måndag 30 december 2013

2013 Top Ten Favorites / 2013 Topp Tio

It's time for the top 10 post again! (Really?! How is it possible that it's already been a year since the last time I made my previous list?) I'm listing the brand of stamps I've used, though if you want to know more in detail you can find lists in the original posts.


Here we go: My top 10 projects of 2013:

Using my own digital image, Stampers anonymus, Creative Expressions and My Stamp Box.

Paper smooches, My Stamp Box.

Paper smooches.

PTI, Paper smooches, My Stamp Box.

Dollar bin stamp, PTI.

Paper smooches.

 Paper smooches.

Prima.

No stamping involved!

Prima.


Happy 2014 to all of you!

... and finally a Christmas card...


M
erry Christmas and a Happy New Year to all of you!


---

Stuff used:
Stamps: Come all ye faithful (PTI), God Jul (Kort & Godt). 
Other: PTI ribbon, MS snowflake punch, the heart is from the Love Lives Here butterfly die, PTI pure poppy felt, PTI rustic cream CS, PTI ink (Dark chocolate, Scarlet jewel), paper: "lost and found Christmas" from My mind's eye, white sequins, flowers "paper blooms" Kaisercraft.


tisdag 12 november 2013

LO no.4 - I love you!


Hi again!
This is my layout no. 4... If you're familiar with Anna Dabrowska's work, you'll see that I am using her techiques on this layout as well. It will probably take awhile before I can find my own style, but I love that I've been able to take some classes from Anna herself - it's a fantastic way to start making layouts.
If you ever have the chance to take some of her classes - do it! She's just as good as everyone says - actually, even better!

söndag 10 november 2013

LO no. 3 - Beware of the Balloonist!

My 3rd layout ever: Beware of the Balloonist!


My youngest niece is a girl of action and she photographs very well. I've been saving this picture to use with Anna Dabrowska's techniques. Doesn't it look like my little relative is planning her next trip? You know, she's always up to something!

söndag 3 november 2013

Halloween 2013 - Cards for my Nieces and Nephew


The One Who Isn't Easily Scared.

I had to make Halloween cards for my nieces and nephew. The cards fit each childs personality!

The Wacky and Cheerful Little One.

The Cool and Brave One.

Stuff used: Different Halloween Papers, PTI ribbons, Glow in the dark spiders, black plastic spider, black plastic bat, Gravestones from the Silhouette Online store, PTI stamps, Dollar Bin Stamps, Googly eyes from Panduro, Ribbon from Cynthia Steele's Halloween Box 2013 and bling stones.

fredag 25 oktober 2013

More from the Finnabair classes

Steampunk love.

One more layout, this time from Anna Dabrowska's class "Industrial Baroque - Steampunk Love" and a shadow box from "Everyday Treasures".


Everyday Treasures Shadow Box.

torsdag 24 oktober 2013

Splash! layout with Finnabair (Anna Dabrowska)

My first layout ever! (I guess you have to click on it to see any details - and they're plenty!)

Finally the day came when I met Anna Dabrowska! I've been dreaming of learning from her since the first time I saw her layouts in 2010. And now, I've been taking 3 courses!
I was in Stockholm at Stockholm Scrap Class's event last weekend, and it's not until now I've had time to publish anything.
This layout is from the "Splash!"class from last Friday.

And this was the first layout I've ever made! I don't know why I've not tried it out earlier. I guess I just needed the right teacher...


Me and my teacher. She's awesome!


söndag 25 augusti 2013

There's still time... PTI Stamp-a-faire 2013 - Whipping Up Scent-sational Cards


I'm glad I continued with the challenges! This is a fun one!

This is actually a home made "scratch-and-sniff" card! The cup smells espresso - real espresso! (I think that coffee with a candy cane is just as nice as a candy cane in hot chocolate.)
Instructions here!


PTI Stamp-a-faire 2013 - Farewell (for now)


It's always hard to decide when to stop crafting, right? How on earth could I make such a mess? I've even been tidying up in between cards!
It's been a wonderful Stamp-a-fair, with tons of ideas and instruction videos. I'll be busy for a long time, because I plan to try out more stuff later. (Maybe I'll even have time to enter yet another card, but I doubt I'll have the time this weekend.) It's already noon here in Sweden, and I say farewell for now!

Edited: I made 2 more cards! :) LOL, didn't I say it's hard to stop? :D


PTI Stamp-a-faire 2013 - Mixing Mists to Match


Next card...
The Challenge is described here. My spray bottle made it a bit mottled, but I think it makes the background look cold, just as it should be on a Christmas card. ("God Jul" means "Merry Christmas" in Swedish).


söndag 28 juli 2013

Inspiration from Melissa Philips - Copy of her acorn jar


Yet another card, in the "Inspiration from Melissa Philips"- series. But this time it's not just inspiration! I tried to copy her card below, to understand how she layers her background papers, how she builds her focal point and how she uses embellishments. 


Melissa's original card. (http://lilybeanpaperie.typepad.com/lilybeans_paperie/2011/08/counting-my-blessings.html)

What have I learned? 
I learned that she's a master at details and puts so much time into making them perfect. I can't handle her subtle colour scheme just yet - I make it all look dirty and shabby (without the "chique"), but I am working on it. 
I need the contrast very much, but I'd like to be able to use all those soft shades - I need to use those inks too, right? :)

I've never ever copied anything this close, but it's a really good lesson. You learn your weaknesses/strengths and it's super hard to try another person's style - especially when you're not used to it! 

I decided to try this approach to my favorite cardmakers last summer when attending the Papertrey Stamp-a-fair 2012 (a totally free online event even this year!) Melissa had a felt bow tutorial and I copied her card as close as I could - and it taught me lots of new stuff. Especially that she continues to improve her card, when I'd think that I'm done! :) I love her results!

This is what I want to do (sometimes) - copy the masters, learn new stuff about techniques, get new ideas - and incorporate them to my own stuff (or at least know what other options I have, that I'd never think about!)...

Though, I couldn't do it all the time. It takes my own creativity away, quite a bit! I see it as a fun tool to learn. I do love to think about how I learn stuff, but yes, I am a teacher myself.

Do you have your own approach to how to learn to handle a style you admire but don't really get the grip of? Please tell!

Have a lovely day!

fredag 26 juli 2013

Inspired by Melissa Philips - A Horse in Sunset


Third post today! (Just don't get used to it!)

I've been meaning to make a series of cards, inspired by Melissa Philips, one of the best cardmakers in the known universe. I'm going to choose one of the cards on her blog, link you to the real thing and then post my own take on it. I am of the firm belief: Copying the masters is how you learn!


The original by Melissa Philips.
http://lilybeanpaperie.typepad.com/lilybeans_paperie/2012/05/on-the-farm.html

Summer Card Camp - A Nautical Card


This card is the second today from Summer Card Camp 2.
Who is NOT inspired by Melissa Philips? I wanted to make my own take on her interpretation of sketch 2, week 3. This is what I came up with!


Stuff I used:

Stamps: Paper Smooches - Smoocheroos, Starving Artistamps - Swedish sentiments.
Paper: Scraps from my stash, Panduro cardstock, PTI stamper's select white cardstock
Other: Bling stone, copic markers and washi tape, wood stars, PTI Limitless Layers Hearts die

Summer Card Camp - Picnic by the Pool


Yes, I am alive!
I've not made any cards in ages, because I've been super busy with wedding preparations, making fabric flowers, flowers in sugarpaste, painting white wooden horses and a million other things... Well, now we're married and yes, I am planning to make some mini albums about it all - you'll most likely see some pics in time!
This card is the first of my cards from Summer Card Camp 2 from Online Card Classes.


I used the sketches and the colour combo from day 1, week 1.


I'm also linking this card to this week's Simon Says Stamp Challenge: Summer Food &/or Drink.


Stuff I used:

Stamps: Lawn Fawn - Make Lemonade, Starving Artistamps - Swedish sentiments.
Paper: Scraps from my stash, Panduro cardstock, PTI stamper's select white cardstock
Other: Bazzil vellum, Cuttlebug A2 Embossing Folder D'vine Swirl, bling stones, copic markers and La-la Land Wave border die.

Have a very nice day!

tisdag 28 maj 2013

More Swedish sentiments!/Svenska ordstämplar i massor!

Here comes a post for my Swedish readers (mostly)! I've been finding some red rubber Swedish sentiment stamps!
If you're looking for some shorter Swedish greetings I'll recommend "My Stamp Box"! They have 7 Swedish sets in clear (photopolymer). (Check out my previous post!)
If you're still interested in reading the post, please press the translate button! :)

Jag är så glad för nu har jag hittat fler ordstämplar på svenska! (Ja, jag antar att många av er redan vet om detta - men jag visste inte det!) Denna gång har jag hittat ett helt ark i rött gummi från Starvingartistamps i USA. Vad sägs om denna mängd ord/uttryck för $29.95 + porto och tull? (Per ord är det inte mycket - och här finns väl i princip allt man kan önska...)

http://starvingartistamps.com/swedish_sentiments_sheet.html

Portot till Sverige går på $14.95 - men för det kan man pressa in så mycket som 5 stycken stora hela ark i kuvertet! (Kanske gå ihop några stycken?) Kom ihåg att räkna med tullens avgifter också!

Tracy på Starvingartistamps säger att det är svårt att pressa det här gummiarket så att alla ord blir bra och att de allvarligt funderar på att sluta tillverka det på grund av det. 
Man får räkna med att man får några extra ord av de ord som inte blev bra! (Men eftersom man klipper isär arket ändå gör det ju ingenting - mer än för syns skull!)
(För alla övriga frågor hänvisar jag direkt till email: strvingartistmp@aol.com. OBS! Detta är ingen annons utan bara ett helt privat tips!)


lördag 25 maj 2013

The Love Monster Graduates – Swedish Style!


The "Love Monster" Graduates!
I found the cute Swedish Graduation cap at our local scrapbooking store yesterday, and I knew immediately what to do with it. When I found the washi tape with the Swedish flags, I just decided I needed it as well!
I love how the washi tape works as banners, and it's really super simple - I just tore the ends!

Summer is near! 
I almost can't believe it!

Have a lovely weekend!
---

Stamps:
Paper Smooches – Falling For You
My Stamp Box – Swedish Sentiments

Dies:
Simon Says Stamp – Talk Bubbles

Cardstock:
Bazzil (blue)

Other:
Washi tape (“Sweden” from YouDo)
3D Stickers (“Student” from YouDo)
Swedish ribbon
Copics
Glossy Accent


Patterned paper from Basic Grey (What’s up?)

torsdag 18 april 2013

Pretty amazing


-->

Just a small card today! I made the background all by myself and yes, it took awhile. But I think it was so worth it! :)
Hope you like it too!

 ---
Stamps:
Papersmooches – Spring Fling
Simon Says Clear Stamps STAMPtember™ FOR THE RECORD Exclusive
Free magazine stamp - daisy

Other:
Simon Says Stamp - talk bubbles dies
White and purple cardstock
Copic markers
Memento tuxedo black ink
Versafine onyx black ink

söndag 14 april 2013

Steampunk girl on adventure


The "Lycka till" comes from "Swedish sentiments- grattis" from My Stamp Box.

Yesterday was such a day, you know, the kind of day when everything you stamp sucks! I try to stick to my usual comcept - that more is more - and that almost always fixes it! (Together with much encouragement from my little craft support group! You're the best!)
I am still not sure that this works, but lately I've been into experimenting a bit...

Can you see where I used dimensionals?
-->

Stuff I used:

Stamps:
My Stamp Box: Sweedish Sentiments – grattis
Avery Elle: Roll with it
Sweet Pea Stamps – Telsa
Crafty Individuals 209
Impression Obsession cover-a-card - clouds

Other:
PTI Stamper’s select white cardstock
Orange cardstock
Green, orange, red and brown stickles
Spellbinders D-Lites Cattails
Black embossing powder (fine)
Black enamel accent (Ranger)
Archival ink sepia
Memento tuxedo black ink
Versafine black onyx ink
Brilliance Pearlescent Sky blue ink
Distress ink
Copic markers
Black wax pen


lördag 13 april 2013

Hittar du inte bra svenska clearstamps? De finns i Canada!/The good Swedish clearstamps are in Canada!


Swedish Sentiments - Grattis
 
Swedish Ocattions - Glad Midsommar

(English text furher down...)

Mina favoritstämplar med svensk text kommer från My Stamp Box i Canada där Bettina von Gross gör roliga genomskinliga stämplar (clear stamps) i fotopolymer. Jag är inte imponerad av de vanliga sladdriga clearstamps som säljs i Sverige, men fotopolymerstämplar fungerar extremt bra och är något helt annat...
Om du har någon av Simon Says Stamps egna clearstamps så är det nästan samma slags fotopolymer, men lite tunnare... (Bra kvalité, stämplar skarpa bilder - och stämpeln sitter ordentligt fast på ditt akrylblock.)
Hon har dessutom massor med andra stämplar. De flesta är på engelska, men hon har också stämplar på tyska, holländska och franska.

Välkomna som grannar

Handla av henne, så kanske vi kan få fler set på svenska!
(Och nej, jag får ingen provision för att jag skriver detta, det är en helt privat recension!)


Swedish Word Jumble - Hälsningar
Hem ljuva hem
---


Today my post starts in Swedish! I wanted to show my Swedish blog friends some great clearstamps with Swedish sentiments I found - in Canada! Bettina von Gross (My Stamp Box) is making photopolymer stamps in more languages - the majority of the stamps are in English, but she also have stamps in German, Dutch and French.
To describe this polymer, I'd say that it's a bit like the Simon Says clearstamps - just thinner. They stamp like a dream!

måndag 8 april 2013

Cheer up Grumpasaurus!


You know, I just had to!
The classic photo from Jurassic Park 1 (the scene that always makes me cry, because I can finally see the dinosaurs "and they move in herds - they do move in herds"...) and the cheerful but dangerous dinosaur from Paper Smooches - a match made in heaven (?!!)
I couldn't help myself! Hope you like it, anyway!


Stuff used:

Paper Smooches stampset "Cuteasaurus"
Memento tuxedo black ink
White embossing powder
Eye from Panduro
Copic markers
Green cardstock from Panduro
Photo from the old JP movie
Foam dimensionals

söndag 7 april 2013

More cows!

"Tack" means "thank you" in Swedish. I love my Swedish stamps from My stamp box! (What a wonderful quality of their clear stamps!) This one is from their "Swedish Sentiments".

Hi again!
I have not been able to do much paper crafting lately, but here's a card - finally!
More cows! I'm sure you're not too surprised... :)

I paper pierced my cows and used some foam dimensionals to pop them up. The colours of the image is from the Versa Magic ink pads. I used the dew drops directly on the paper.

I used the Forest Moss stickles as leaves. You can't really see it on this photo - but it creates a very cool effect! (I'll do this again, for sure!)

I have tons of ideas for cards and other paper projects, but at the moment I'm busy making flowers out of sugar paste in my spare time! :) I'll try to make some more cards soon, though!

Hope you'll have a great day!

---

-->
Supply list for my Thank you card:

Stamps:
Create-A-Scene Stamp Set - Countryside
My stamp box: Swedish sentiments

Patterned paper:
Your life. Beautiful. by Webster's pages
Polka dot paper from my stack.

Ink:
Memento – Tuxedo black
Versafine black onyx
Lots of green, yellow and blue shades of Versa Magic ink

Other:
Stickles - vintage photo and forest moss
twine


måndag 1 april 2013

Longing for October!

Finnabair is coming to Sweden (again) in October, and this time I intend not to miss her classes!
(I've been a fan ever since I saw her work in the Swedish scrapbooking magazine "Scrapbooking mm." issue no 5, 2010!)

Am I going to meet you in class?


These are the classes she will be teaching in Stockholm:
 (All text/pictures are from Anna Dabrowska's homepage. You should check her out! She's awesome!)

1. "Splash” Mixedmedia Paper Layout Class ( with stain and ink splashing, stamping, spraying... and more!)

You think it is time to try something new, a bit different than traditional, multi-paper scrpbooking projects and popular embellishments? Do you want to have some creative fun, go artsy playing with paint, inks, stains...or something even more surprising? Maybe you feel it is high time to try using some more white negative space?
Let me inspire you with some really cool ideas for creative, totally customized mixed media paper layouts! You really don't need a lot to create a spectacular project – let yourself to play with sprays, inks, stamps and have great fun with designing your project from the very beginning to the surprisingly energetic end. The possibilities are truly amazing... and experimenting with them is pure fun!
During this class I will share with you my experiences in creating layouts based on my favorite ink techniques: splashing, spraying, ink-dropping, stamping and painting I'll show you several finished projects which will inspire you to experiment with color and show you how to “embrace the imperfections” ! Will give some tips about layout composition and page balance, especially on negative space based projects. I'll tell you more about using paper, fabric and paint go get layers and show you some cool techniques for creating artsy, freestyle pages.
During this class I create with a group a full sized, freestyle layout based on mixed media techniques stamps and color products from well known manufacturers such as Ranger, Prima Marketing and La Blanche.
Give your scrapbook pages, new, a bit crazy, a bit funky look ... don't be afraid to express yourself.... and get your fingers dirty!
Usual class time: 2,5 -3 h


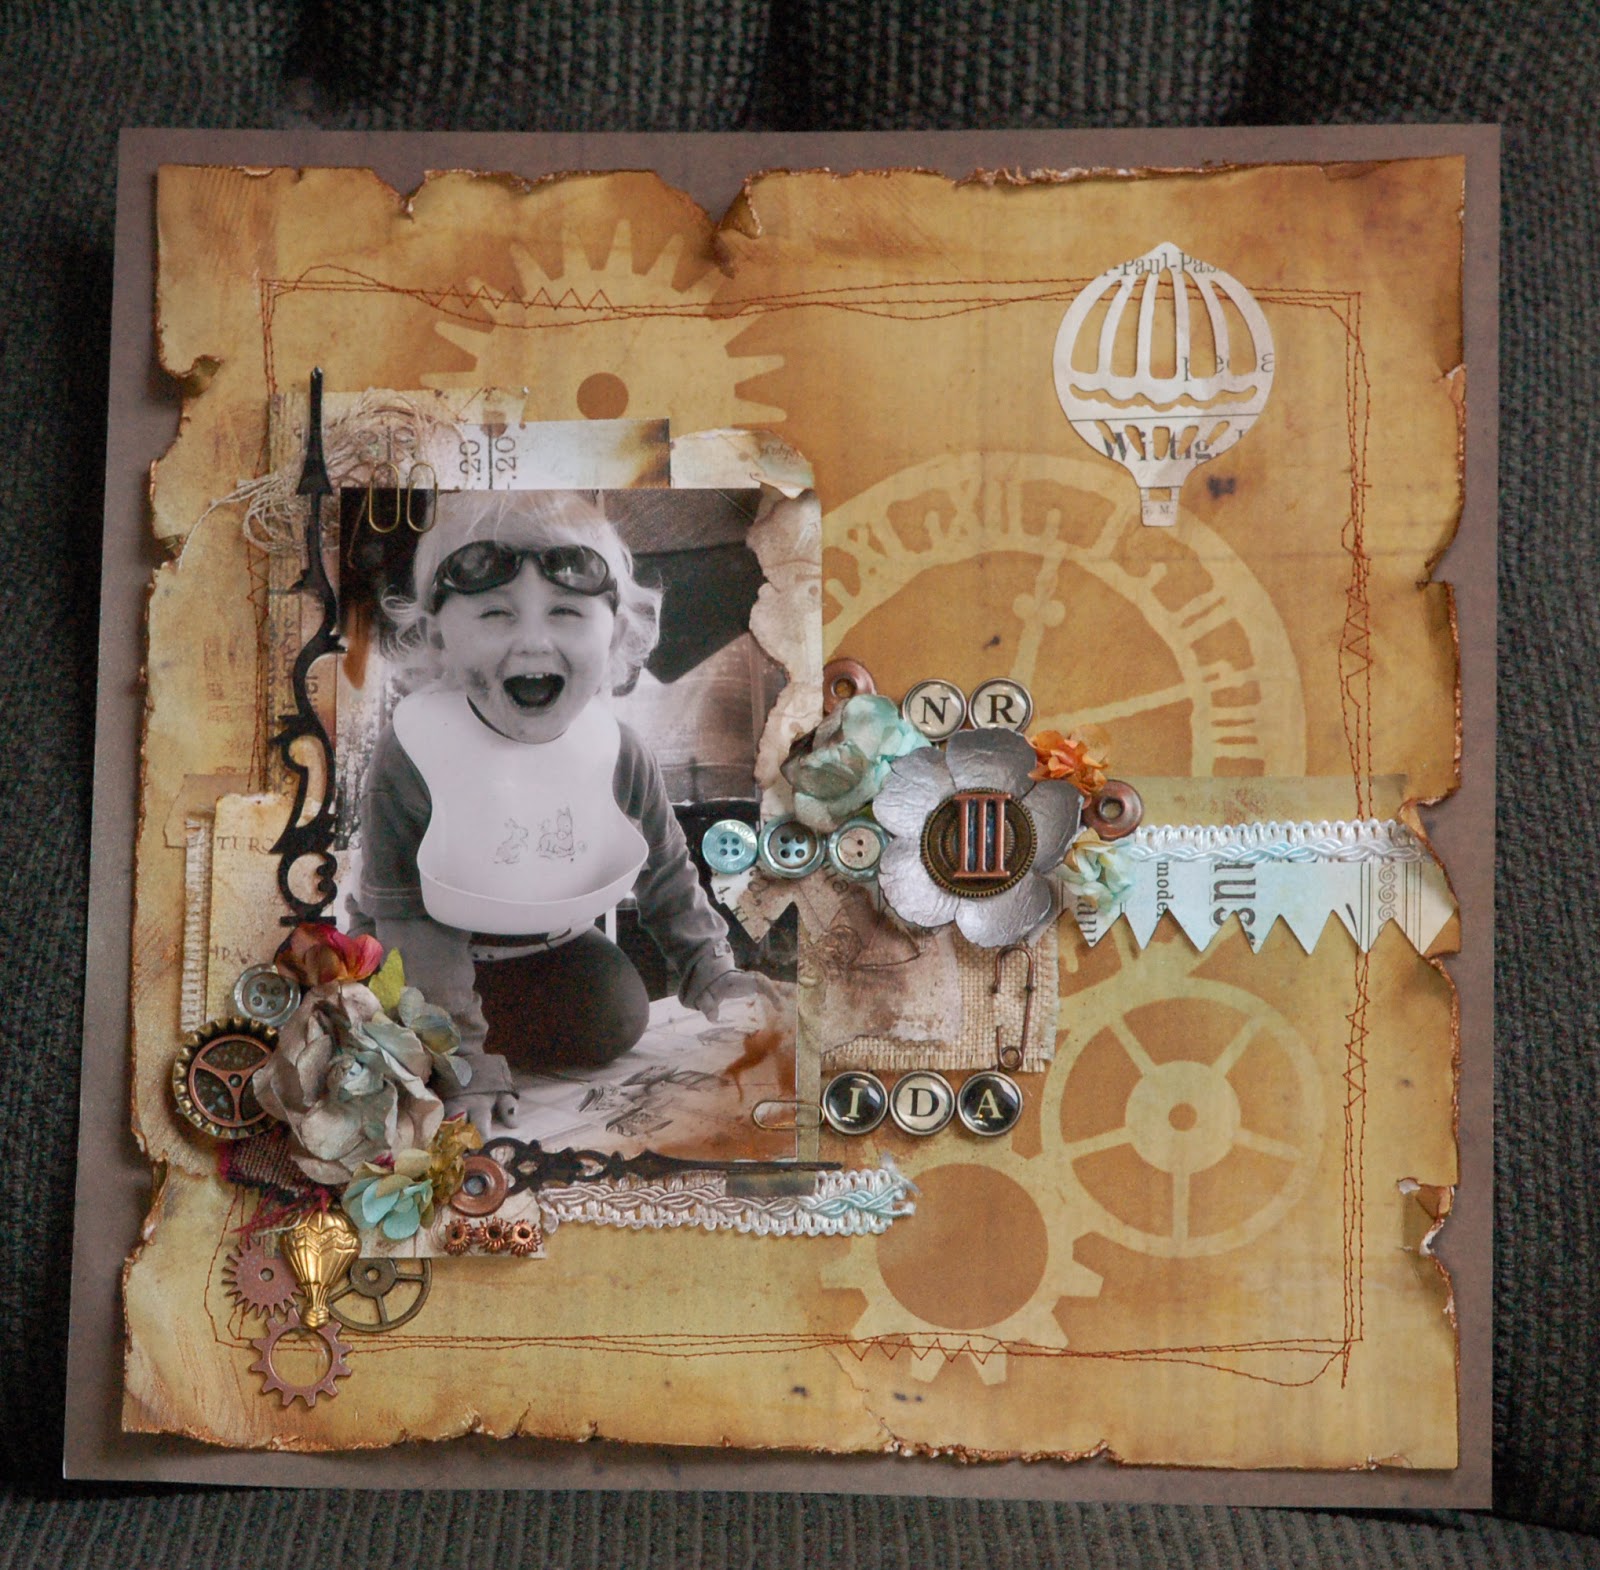
2. Industrial Baroque
Paper Layout Classes based on mixedmedia and scrapbookintg techniques. Their common part is multi-layering, richness of techniques. using a wide range of mediums and loads of  elements to create one-of-a kind, personalized project. Industrial Baroque is time for making your fingers dirty, creativity flowing and pushing the boundaries of your imagination. 


Grunge is a style, which is, in my opinion, the essence of creative fun and freedom: you can put almost everything on your project and be happy with the effect you got. You may give as much or as little elements as you want, you may use medias and inks… Grunge is usually considered as “boyish” or “men” style, but I'd like to convince you that it also as the more feminine, crazy, eclectic side – let's call it “industrial baroque”.
 During classes I will try to convince you that creating a grungy, eclectic layout is not hard at all - and the only boundaries you have are those made by your imagination! I will make you look again at your embellishments and how you possibilities of using everyday objects as a part of your composition, giving them the uniqueness, personal touch and grungy style. I will show you finished projects and share my experiences from the creative process. On each class I will create with the students a full size layout including products from well known manufacturers and demonstrate possibilities of mixing different medias, scrapbooking supplies and found objects to get baroque look of your project.
"Industrial Baroque" is a perfect combination of fun, experiment and playing with composition, color and texture.
Usual class time: about 3,5 - 4 h. 

"Steampunk love":
( - an Industrial Baroque class)
Paper based mixedmedia class with masking and layering, spraying, gel mediums, acrylic and metallic paints and pastes toghether with hard, grungy and steampunk elements ina good company of lace and flowers. The "heaviest" look in the range!


3. Everyday Treasures
- Mixed-media shadowbox class with lots of techniques including gel mediums, inks, paint and more! Great fun with found objects and pure creativity.
We are surrounded by inspiring objects: at work or at home, in the city and in the countryside – there are things which are usually not visible for us…they are too common, too plain to be noticed. But try to look around, open your eyes wider – I’m sure you’ll find real treasures all around you, and all of them have their own stories which want to be told! Take a second look in the drawer, check your attic, search through the wardrobe…or visit the flea market – the possibilities are endless and your creativity will amaze you – just give the chance to yourself and the little everyday treasures from your neighborhood.
There are no boundaries in creating mixed media projects: you may give as much or as little elements as you want, you may use medias, paint and inks…and whatever comes to your mind too! Don’t be afraid to mix and blend and let your imagination free – it is pure fun!
During this workshop I’ll try to convince you that beauty can be found everywhere – and it is waiting to be discovered. I’ll guide you to create your own mixed-media shadowbox, based on my favorite layering techniques and choice of embellishments, colored with a wide range of color products. I’ll demonstrate possibilities of mixing different medias like gel mediums, paint, ink, scrapbooking supplies and found objects to get interesting layers and details on the unique grungy project.
This workshop is suitable both for beginners and advanced crafters.
Class time: about 3,5 h.